 Figure 1
 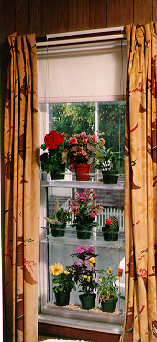 Figure 2 Figure 1
Figure 2
Figure 2 Figure 1
Figure 2
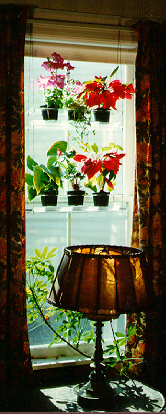 Figure 3
 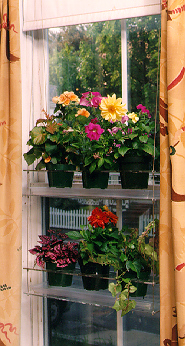 Figure 4
 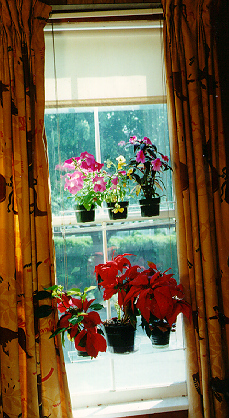 Figure 5
 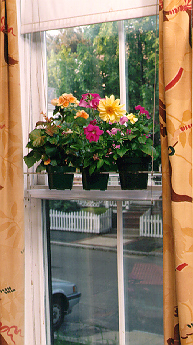 Figure 6
ORDER
 Figure 7
Turn
Any Window Into a Greenhouse!
Beautify
Your Living Room Windows
Grow
Herbs in Your Kitchen Windows!
Indoor
Window Gardening
with
Indoor
Window Plant Hangers
(Adjusts
Six Ways for Your Changing Needs)
Main
Features
� Fully assembled and ready to hang.
Cables are 1/16" stainless steel (almost invisible).
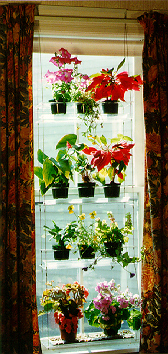
� Hang 1, 2, 3 or 4 modular plexiglass shelving units on strong
cables, fastened to each end of a right-angle bracket mounted over the top
of your window molding. Each shelf holds up to three plants. Hang up to twelve
plants of different size in one window. Shelf Size: 19 1/4" x 6". Cable capacity:
120 lbs.
� Slide Shelves up and down cables as often
as you wish. Just loosen the clamps under each shelf, reposition the clamps
and re-tighten.
� Add or subtract shelves as the seasons and
your design needs change (see
pictures).
� Easily add additional lengths of cable.
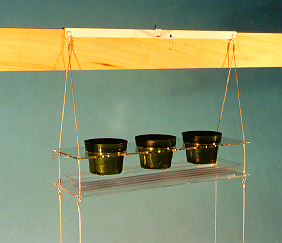
� Shelves are either a single layer of plexiglass if they have a humidity tray and no holes for pots, or they are double layers of plexiglass if there are holes for pots in the top layer and a separated lower layer with a humidity tray. The bottom half of a Double Layer Shelf is always a Single Layer Shelf.
Easily switch the top half of a Double Layer Shelf from holding three small 4"-4.5" plants like herbs, African Violets, ivy and cactus to holding two larger 5"-5.5" plants.
Use a Single Layer Shelf for Bonsai,
tray designs, orchids, bulbs and other larger plants 5"-8".
� Double Layer Shelves easily change into Single
Layer Shelves, and vise versa.
� Professional "pour-through" watering:
no need to move plants for watering; watering is quick and easy; no collection
of water in pots; drip through water automatically collects in humidity tray;
end water marks on rugs.
� Plant hangers need only one nail at
the top of the window molding; this hole is not visible. Hold up to twelve
plants with just one finishing nail.
� Slip bracket off finishing nail and move unit
to different windows as seasons or design needs change. Also use plant
hangers on room dividers and porch and ceiling beams.
� Plants in Double Shelves won't blow
over, or tip over from accidental knocks by cats.
� Plants get all the light they need.
� Easily open and shut windows, or raise
or lower shades. Plants are kept a safe distance from cold window glass.
� On wide picture windows hang two or
more units, side by side.
� Shelves are made of sturdy, optical
quality, 1/4" plexiglass. Each shelf is then flame polished by hand. This
process produces the best looking product.
� Order our flexible Starter Kit or, alternatively, measure
the distance from the top of the molding to where you want the bottom (lowest)
shelf to be. Tell us this length and we will make the cables to match this
number.
The loop on the optional hanging basket attachment rotates and you should turn the hanging basket every couple of days to keep all parts of the plant getting light.
You can hang a basket with the store supplied hanger, or you can remove the hanger and insert your own shorter wires or use our set of 3 stainless steel wires and hang this arrangement. Replacing the hanger allows you to get the basket much higher on the window so it will look better with multiple shelving units.
You can use an empty small hanging basket to hold any regular pot and turn that pot into a hanging basket plant. You can also set small hanging baskets without wires onto plexiglass shelves.
If you decide not to use the hanging basket attachment with shelving units on a particular window, you can use the hanging basket attachment by itself on a second window with the small bracket included for this purpose. Position the small bracket as before and nail the same way. You can remove and replace the small bracket with a regular bracket (slipped onto the same nail) at any time.
The regular top bracket can be placed on the molding of a room divider and hanging baskets may be hung from either end, using a short loop of sting, and/or from the middle of the unit by either a short loop of string or from the hanging basket attachment.
Poke a small hole in the center of large clear vinyl saucers resting above holes in plexiglass so extra water will automatically pour through saucer into the humidity tray. Use a nail to make the hole. Also put a nail hole in clear vinyl pots sitting in holes in the plexiglass just above a humidity tray.
For plants on single shelves, set pots on humidity tray filled with 3/4" of white pebbles. Alternatively, set pots in individual clear saucers, with or without pebbles. Pots should not sit continuously in water. Drain excess water above pebbles or in bottom of clear vinyl containers with kitchen basting tool.
If humidity trays gets too full of water you can also move a corner of the humidity tray off the plexiglass shelf and press down on this corner, pouring the water out into a sturdy container. Don't try to move shelving units with water in the humidity trays; inevitably the water in the humidity tray will spill.
Instead of using a humidity tray, you can slip a clear pot under a regular pot which sets in a hole in the plexiglass. The clear pot sets on the lower shelf. There will be a safe space for water to collect from plant run-off above. You don't need to use pebbles with this approach. However, the bottom pot can easily get too full of water. When this happens, lift the top plant slightly so the clear pot below is free. Then remove, drain and replace the clear pot.
Hanging baskets may be easily and quickly watered with pour through watering using the following approach. Tie a string from one of the hanging basket wires around the bottom of the plant to an "S" hook which hangs on the edge of the pot directly opposite the knotted end of the string on the hanging wire. Leave this string attached. When you water the plant, hang a little bucket (optional accessory) from the center of the bottom string. Excess water will collect in the bucket for later dumping. Move this hanging bucket around your hanging baskets, watering your hanging baskets as you water the rest of your plants.
Automatic wick watering is not a good practice generally as plants get too much water. However, it can save your plants while you are away on a vacation. Stick nylon stocking strips from humidity tray into bottom holes in pot. These wicks can soak up water from the humidity tray for constant watering. Wicks can be draped over the back edge of the humidity tray when not in use, or removed.
Use clear vinyl pots, trays and saucers to collect excess water and serve as humidity trays. This way light can pass through these containers into the room and to the plants below. They also look much better against the window and one can see through them to the outside.
Enjoy your study of light, form, color and growth. Resonate with the seasons as you add to your collection. Learn the folklore and history of each plant so that as your collection grows, it will become a microcosm of the earth itself and its history. Start slowly by buying a few small plants. Everyone who comes into your home will experience the beauty and joy of your efforts.